Showing posts with label cake. Show all posts

Black Forest Ice Cream Cupcake - Eggless recipe


Hello All,

This is another sinful indulgence, you may like to prepare at home. A very easy recipe with home made iced cream rather than ice cream layered in a soft spongy eggless chocolate cup cake.

the recipe

maida / flour - 75 gms
powdered sugar - 75 gms
cocoa powder - 1 tbsp
baking soda - 1/3 tsp
baking powder - 1/3 tsp

yoghurt - 60 ml
vegetable oil - 30 ml
vanilla essence - 1/2 tsp

paper cupcake moulds - 12 (optional)

ingredients to assemble the cake

whipping cream - 100 ml
powdered sugar - 5 tbsp
vanilla essence - a drop
few chopped cherries
cooking chocolate or chocolate shavings

method

assembling the dry ingredients

Place a sieve on a bowl and sift together flour, sugar, cocoa powder, baking soda and baking powder.

assembling the wet ingredients

Place the yoghurt (beaten), oil and vanilla essence in a bowl.

Preheat oven at 200C. Place paper moulds into muffin tins.

Add the dry ingredient mix into the wet ingredient bowl in 2 portions. Gently stir with a spoon till fully combined.

Pour 1 tbsp of the batter into the prepared moulds or into prepared muffin tins. The batter should be only half of the mould. Bake in the preheated oven at 200C for 10 to 12 minutes. You will get soft and spongy cupcakes as seen below.


Once the cake has cooled down to room temperature, place it in the refrigerator for at least 12 hours.

To assemble the cake, keep the whipping cream in the refrigerator (dont keep in the freezer). Once cold, use a chilled bowl, chilled balloon whisk to beat the cream. Pour the cream in the bowl and whisk it till soft peaks forms. Drop the one drop of essence and gradually add the powdered sugar. Freeze the mix for about 1 to 2 hours. I could wait only for one hour so the ice cream started running when i placed it on the chilled cake.


Cut the cupcake into 2 as seen above. I had added some apricots and almonds, because  initially i had no plans to ice this cake.

Place a dollop of ice cream on the lower half of the cake and  place the upper half on top and sprinkle the chopped cherries and then place a big dollop of ice cream on top. Once this is done for all the cupcakes, place it in the freezer for about ten minutes or else it will melt away. Take the cake out and use a peeler to shave the chocolate directly on the black forest ice cream cupcakes. Serve it immediately.

If you like to serve as seen in the first picture above, follow these steps.

Take a serving bowl and place a dollop of ice cream and then place the prepared black forest cupcakes. This would be more interesting because you can get to eat a lot of ice cream along with the cake.

Cheers!

Strawberry u/d Chocolate Cake (eggless) - Happy Valentine's Day


Happy Valentine's Day. V- Day is not officially celebrated at home so I am not detailing much about it. I prefer to celebrate the day 'coz you can have another day of gifting & cheer... :-)

This cake is an eggless one as mentioned and it was tasty....the downside up was sweet with all that brown sugar in there...and the tiny pieces of strawberries however baked and merged itself into the batter...that is why u can see some gaps in there..the only suggestion besides this recipe is to just halve the strawberry  so that it stays intact even after it is baked...


ingredients for the upside down base


Strawberry – 10-12 nos, chopped
Brown Sugar - 4 tbsp
Butter – 2 tbsp
Dry ingredients for the cake

Flour – 1 1/2 cups (150 gms)
Cocoa powder – 3 tbsp
Baking powder – ¾ tsp
Baking soda – 1/3 tsp

ingredients for the wet mix

Brown Sugar – 4 tbsp
Condensed milk – 200 ml
Milk – 20 ml or cream - 3 tbsp
Oil – 7 tbsp
Vanilla extract – ¾ tsp


Method

Preheat oven at 180 C.

Prepare a heart shaped pan or a pan of your choice (butter the pan and sprinkle flour and dust off excess flour). Place a butter paper which is generously spread with butter. Sprinkle the brown sugar evenly and place the chopped strawberries evenly. Keep it aside.

In a bowl mix together the wet ingredients and stir till the brown sugar is melted.

Sieve together the flour, baking powder, baking soda and cocoa powder.

Stir in the dry ingredients into the wet ingredients. Stir till no lumps are found. Immediately pour the batter into the prepared pan. Bake at 180 C for 25 - 30 minutes or until a skewer inserted comes out clean.

Take the cake out of the oven and let it cool for 10 minutes. Since you have a butter paper at the bottom, taking the cake out is an easy task. Just turn it into a plate, cut it and eat it..thats it...

cheers

Buttermilk Fruit Cake - - - - - Eggless


After the MARBLE FRUIT CAKE recipe, this is yet another fruit cake I prepared during this season. The reason is nothing but last Christmas i had kept the Kerala Fruit Cake / Plum Cake recipe to be published on the day before Christmas and it never happened. So this year I am on a spree to prepare fruit cakes and i have researched and shortlisted many recipes to be tried. Do stay tuned to this space for more fruit cake recipes.

This Buttermilk Fruit Cake recipe is adapted from Joy of Baking and this was just perfect. I have slightly adjusted the quantity of flour and buttermilk to suit the kind of maida / flour available in Kerala. I feel the volume of flour is less for what we get here. There is also a healthy twist to this recipe. I have added wheat flour to more than half part of the flour. The cake was perfect and there was lot of appreciation from my family and colleagues who had this cake. So, if you love some positive comments do try this one. It is a foolproof recipe (with lots of thanks to Joy of Baking).


the recipe


dry ingredients
Flour (Maida) – 100 gms
Wheat flour – 140 gms
Sugar – 160 gms
Nutmeg – 1/3 of a seed or 1 tsp nutmeg powder
Cinnamon – ¾ inch piece or 1 tsp Cinnamon powder
Baking soda – 1 tsp
Salt – 1 generous pinch

Dry fruits – coarsely chopped

Dark raisins – 80 gms
Dates – 100 gms approx ( I used about 15 dates)
Golden raisins – 100 gms

Wet ingredients 

Buttermilk – 250 – 260 ml
Melted butter (unsalted) – 120 gms
Vanilla extract – ¾ tsp


the method

Preheat oven at 170 C. Prepare a round cake pan by applying butter and dusting flour. Place a round sheet of butter paper , parchment paper or any white paper on the bottom of the pan.

Sieve the flour, wheat flour,  salt and baking soda once. Powder the sugar alongwith the nutmeg and cinnamon (if using whole spices). 

Place the flour mix in a bowl. Use about 1/4th of the flour to coat the dry fruits (this is to prevent the dry fruits from sinking into the bottom of the cake).

 To the remaining flour mix, add the sugar mix and mix well.

Melt butter in a pan and let it cool to room temperature. Pour the buttermilk and vanilla extract and mix well. 

Pour the wet ingredients into the dry ingredients and add the flour coated dry fruits, mix quickly and immediately pour into a prepared pan. 

Bake at 170 C for 35 – 40 minutes or until a toothpick inserted comes out clean. If the cake starts to brown after about 15 to 20 minutes, cover the cake pan with a parchment paper.

Serve warm or cold.

We had this for breakfast. You can keep the dry ingredients ready a day or two before and keep the chopped dry fruits in the refrigerator. Whenever you feel like baking just mix and bake.

cheers...

....if you like this blog dont forget to click the LIKE button on Facebook Fan page 


also read
Marble Fruit Cake


Marble Fruit Cake


It is Christmas season …(well too early to say that…though….) and time to indulge in some cakes. Infact there need not be any reason to prepare this cake but to prepare a fruit cake I think you need a seasonal inspiration.

The idea of a marble fruit cake has been in my mind for sometime and I tried it with some skepticism. But the result was fabulous with lots of appreciation from all quarters…. to whomever I shared. This is an easy cake since the amount of fruits is comparatively less and does not require long preparation time for chopping or soaking ….it is just all quick.

The flavors of vanilla and chocolate alongwith the flavors of orange rind and rum complement well to give a really nice taste.


the recipe

Butter – 120 gms
Flour – 3 cups (300 gms)
Baking powder – ¾ tsp
Egg- 3
Caster Sugar – 2 ¼ cup (240 gms)

Combination of fruits & nuts

Dates – 10
Raisins – 20
Cherry – 20
Walnuts – a handful
Almonds – a handful

Rum – 2 tbsp or orange juice – 2 tbsp
Salt – 2 pinch

Cocoa powder -2 heap tbsp
Milk – 3 tbsp

Vanilla extract – 1 tsp
Orange rind, chopped – 1 tbsp
Blanched almonds - 10


the method

# Chop the fruits and soak them in rum or orange juice for 2 – 3 hours.

# Prepare a baking pan (butter the pan and dust it with flour). Place a round sheet of paper on the bottom of the pan. I usually prepare the pan and leave it in the refrigerator so that the butter does not melt and lose its consistency.

# Sieve the flour, salt and baking powder three times.

# Mix the soaked fruits and nuts. Dust one fourth of the flour mix with the fruit and nut and roughly mix.

# Add the cocoa powder to the milk, mix well and keep it aside.

# Since this is a marble cake, two bowls are required for the cake batter.

# Preheat oven at 170 C.

In a mixing bowl, place the butter and beat it with an electric mixer until soft. Add the sugar in 3 batches and continue mixing. Once all the sugar is added beat in high speed for 5 minutes until the butter sugar mixture has doubled in volume. Add the egg one by one. Beat well after each addition. Add the vanilla extract. Add the flour in 2-3 batches and mix with a spatula. Add the orange rind and flour coated, fruits and nuts.

Pour half of the cake batter into another bowl. Add the cocoa mix and mix well.

Take the prepared pan and first place one third of the vanilla batter in the middle of the pan. Then place half of the cocoa batter followed by a third of vanilla, another half of cocoa and finally the third portion of the vanilla batter. Make sure the batter is place in the middle one after another.

To spread the batter till the edge of the pan and to get the marble shape use a knife or your pointing finger, dig into the middle of the batter and gently move it in circular motion. Tap the cake pan gently so that the batter smoothens itself on top.

(At this stage I was slightly in a hurry and that is why the marble shape did not appear clearly. For a better understanding of the marble design please take a look at the simple marble cake which I have prepared earlier).


Decorate the top of the cake with blanched almonds. Bake at 170C for 30 – 35 minutes. Check after 30 minutes till a skewer inserted comes out clean. Take out the cake and let it cool.

This is a very moist and super delicious cake. Do try it this Christmas season and  let me know.

cheers..


the recipe goes to Bake Fest & Christmas Delicacy & Hearth & Soul Blog Hop


Coconut Cake with Custard Apple & Cream


I have been wanting to prepare a Coconut Cake for a long time. I was in doubt whether I should use fresh coconut or desiccated ones. Finally I decided to prepare homemade desiccated coconut and the cake thus happened. The idea of custard apple and cream is from Chef Vicky Ratnani. I saw it in a program called ‘Do it Sweet’ aired on NDTV Good Times.


ingredients for the Coconut Cake

Flour (maida) – 3 cups
Eggs – 3 large or 4
Caster Sugar – 2 ¼ cup
Veg oil – 1 ¼ cup
Vanilla Extract – 1 tsp
Baking powder – 1 tsp
Dessicated coconut – 6 tbsp (Check ‘Basics’ page for method)

ingredients for the Custard Apple Cream

Custard Apple – 3 (just ripe fruit)
Sugar – 3 tbsp
Whipping Cream Powder – ¾ cup
Chilled water – 40 ml

If you are using fresh cream you might require 300-400ml medium fat cream


Method to prepare the cake

Preheat Over at 180 C.

Sieve the flour and baking powder three times.

In a mixing bowl, beat the eggs one by one: Place one egg in the bowl and place the electric mixer on the yolk and start fluffing up the yolk and white until they are combined well. Continue with the other eggs. Once all the eggs are added continue for one more minute.

Add the caster sugar little by little in speed 1 or 2. When all the sugar is added switch to high speed and continue beating for about 5 minutes till the mix has doubled in volume. Add the vanilla extract and oil and mix together for a minute.

While adding the flour, use a spatula to mix the batter. Add the flour little by little until fully used up. Add the dessicated coconut and mix well. Pour into the prepared pan and bake at 180C for 40 minutes (Keep checking after 35 minutes because oven temperatures vary). Let it cool in the pan for ten minutes.

Take the cake out of the pan and let it cool for a day (Keep it wrapped in an aluminium foil in a refrigerator).

Method to prepare custard apple cream

Deseed the Custard Apple. Grind it coarsely along with 3 tbsp sugar.

Place the whipping cream powder in a bowl and gradually add the cold water and whip it into cream. Add 2 tbsp cream into the custard apple and blend for a second. Transfer the custard apple mix into the whipped cream and gently fold in.

Assembling the cake

Cut the cake into two horizontally. Place a layer of the custard apple cream on one layer of the cake. Place the other half of the cake over it. Place the whipped cream in the middle of the cake and spread it to the sides evenly. Decorate the cake with custard apple seeds (not to be eaten – take care while serving the cake to kids).

Enjoy!!

Lemon Cake with Lemon Curd and Cream


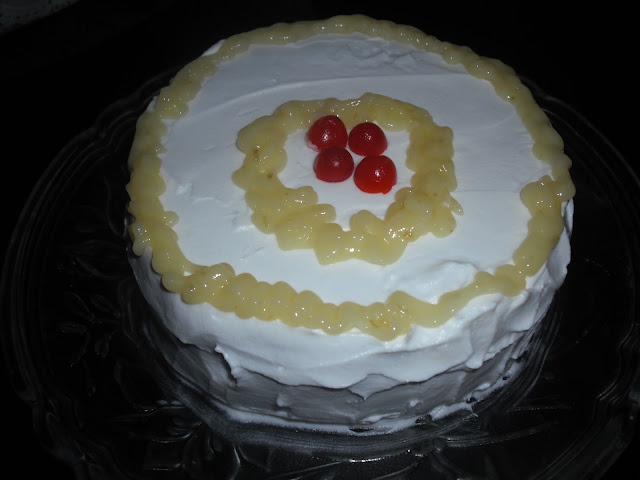
The combination of lemon cake with lemon curd and cream is something to die for!

The idea of preparing a lemon cake is adapted from Food buzz while the lemon curd has been on my to do list for a long time and the cream is of course to give a balance to the extremely citrussy flavor in the cake and the L.Curd.

I got slightly lazy and impatient on the course of preparing this and it has reflected in the way the cream and the icing looks. And of course I have learnt a lot of lessons that should be taken care of while preparing lemon curd and storing it.

For the lemon curd I followed the recipe from Joy of Baking. I did not follow the recipe thoroughly and so I got to learn that the lemon curd has to be strained as soon as it is taken off heat . This is to get rid of any lumps, as well as to strain the zest of lemon which otherwise will increase the sourness of the lemon curd and gives a slight bitter taste as it sits, and it is also easy to pipe the lemon curd when there is no zest in it which is likely to get stuck in the nozzle…….Here is my slightly bad looking yet very tasty lemony cake.


Ingredients for the lemon cake

Flour – 2 cup (200 gms)
Eggs – 2
Baking powder – ½ tsp
Caster sugar – 2 cup
Vegetable oil – 1 cup
Vanilla Extract – ¾ tsp
Juice of 1 ½  lemon
Zest of one lemon

Method to prepare the cake

Preheat the oven at 180 C. Prepare a pan: butter the pan and dust it with flour. Tap out excess flour.

Sift together the flour and baking powder thrice. In a mixing bowl, place beat the eggs one at a time. Add the caster sugar in 3 to 4 steps at speed 1 and then beat the mix at high speed for about 4 minutes till it doubles in volume. Add the vanilla extract and mix well. Pour the oil little by little while still mixing.

Stir in the flour 2 tablespoons at a time and mix it with a wooden spatula. When half of the flour is used up add the flour, followed by a teaspoon of lemon juice. Repeat the process till the flour and lemon juice is over. Stir in the zest of lemon. Pour the batter into the prepared pan and bake at 180C for 25 – 30 minutes or till a toothpick/ skewer comes out clean.

Let the cake cool completely.

Ingredients for Lemon Curd

Egg – 1
Juice of one lemon
Zest of one lemon
Caster sugar – 50 gms
Butter – 1 tbsp

Place the egg in a pan and lightly beat it with a fork. Pour the lemon juice and add sugar. Mix well.

Prepare a double boiler (A pan with ½ to ¾ boiling water – once the water has started boiling turn to low heat).

Place the pan with the egg mix in the double boiler and mix well. When the egg mix begins to form the consistency of custard, add the zest of a lemon. Continue stirring till the mix gains a thick consistency (about 6-9 minutes). Strain it immediately and add the butter and mix well till the butter is melted. Let it cool completely. Place a cling film or plastic wrap on top of the lemon curd to prevent the formation of a thick layer. Place it in the refrigerator till use.

Other Ingredients

Whipped Cream – 1 cup
Few Cherries

Assembling the cake

Cut the cake into two. Spread the lemon curd, followed by cream. Place the other piece of cake and smother it with lemon curd as seen in the second picture. Spread the whipping cream in the cake evenly. Place few about 3-4 tablespoons of lemon curd in the icing tube (use a nozzle of your choice) and pipe out a preferred design. Place few cherries on top for a color contrast. Serve immediate or chill it and serve. I like the chilled one. Enjoy!!


the recipe goes to Sinful Delights by Vardhini

Cherry, Cashewnut & Oatmeal Brownies


When you don't have many oatmeal porridge fans at home, the only way to add it in our diet  is to change the logic in which it is cooked. I hide the oats in pancakes, bread, sweet & savory dumplings, soups and also tried adding it in brownies. 

The brownie had a chewy texture. It was much to my dislike....so I leave a choice to you, if you like chewy brownies add oats other substitute it with flour and go ahead with the following recipe.As regards the cherry and cashew, it was very tasty. Cherry in chocolate is a really lovely combination. 

the recipe

bittersweet chocolate - 100 gms
butter - 100 gms
eggs - 2
sugar - 3/4 cup
cocoa powder - 2 tbsp
cherry - 1/4 cup
cashewnuts - 1/4 cup
flour - 1/2 cup
oats - 1/4 cup
vanilla extract - 3/4 tsp

the method

Preheat oven at 170 C. Prepare a square pan and line it with a butter paper.

Chop the chocolate and butter into small cubes and place it in a mixing bowl (this will be the mixing bowl for the entire brownie batter). Place the bowl in simmering hot water. Stir the chocolate and butter until they melt. Take it out of the double boiler and rest it until it becomes warm. 

Certain recipes recommend the use of whisk instead of electric beater to beat the sugar and eggs. But I strongly recommend the use of electric beater at speed 1 or 2.

When the chocolate mix is warm add the sugar spoon by spoon until well incorporated. Add the vanilla extract and eggs. Add the eggs one by one. Mix the flour, cocoa powder and oats. Add it to the chocolate and mix well. Mix the cherry and cashew nuts with a tablespoon of flour and add half of it to the batter. Pour the batter to the prepared pan. Sprinkle other half of cherry and cashew on top of the batter.  Bake for 30 - 35 minutes. Keep checking after 30 minutes. The cherry, cashew and oatmeal brownies are done when a toothpick inserted comes out with few lumps of cooked batter.

The recipe goes to Priya’s CWF – Oats event started by Kiran


Orange Cake


Whenever I see citrus fruits, I just think about using them up in my cooking: as a fresh ingredients or a cooked one. The reason is nothing but citrus fruits are very refreshing. Hope you will agree that even a simple lemon juice with a dash of salt is a way of rejuvenation when you are exhausted. If you are apprehensive about using salt in lemon juice, i would say it is highly recommended. This comes from my days in the NCC when salted and sugared lemon juice was served during breaks. 

The idea of an orange cake has been in my mind for quite some time. Somehow the addition of the whole orange peel kept me thinking whether i should try this or not. Finally, I stumbled upon an orange extract recently. I knew I cant buy it just for a one time use. So i thought about preparing orange soufflé, orange cupcakes, orange muffins and of course an orange cake to use the whole thing up. And then I dint buy the orange extract. An orange extract is not actually needed for the cake. Fresh orange is used to bring out the flavor. 

the recipe

Orange - 2
Flour - 3/4 cup
Baking powder - 1 tsp

Egg - 2
Caster sugar - 1/2 cup
Oil - 1/2 cup
Milk - 5 tbsp
Vanilla extract - 3/4 tsp

to prepare the pan

Butter - 2 tsp
Flour - 1 tsp

the method

Chop the one orange into tiny pieces along with the peel. Deseed the orange as you cut it. This can be done by cutting the orange into half horizontally and then cutting through the segments. Keep it aside.

Prepare a cake pan by greasing it with butter and then by sprinkling flour. Dust off excess flour. I used a bundt pan 'coz the cake mixture is moist

Sift the flour and baking powder three times. 

Preheat the oven at 180 C for 5 minutes.

In a bowl, beat the eggs one by one at minimum speed. Add the sugar 1 tbsp at a time and run the electric beater in swirls. When all the sugar is added turn to high speed and beat the egg and sugar mix until it has doubled in volume. Add the vanilla extract and mix well. Pour the oil and beat till thoroughly incorporated. (I use a spatula to mix flour). Keep aside 1/4 of the flour. Add the remaining flour in batches alternatively with tablespoons of milk starting and ending with flour.

Mix the chopped orange with 1/4 of the flour (this is to make sure that the orange doesn't get collected at the bottom of the pan). Add to the cake mix, mix well. Pour it into the prepared pan and bake at 180 C for 35 - 40 minutes. Check whether a skewer or knife comes out clean. Take the cake out of the pan after ten minutes or when the cake has partially cooled. Pour juice from one orange on top of the cake. 

afterthoughts:

If you feel the top of the cake is getting overly browned / burnt cover the cake pan with parchment paper after the first 12-15 minutes of baking.

I have used a whole orange in this cake - peel on.....kids may be fussy about eating the peel....the peel can be substituted with rind from one orange.

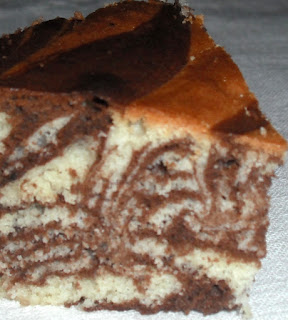
Chocolate & Vanilla Marble Cake


From the very first time I tasted a marble cake, the design has intrigued me. When I learnt how it is done, it seemed quite simple. I prepare the cake both in convection as well as microwave mode. If baked in microwave, the cake does not have crust on the side, but tastes the same and has the same design.


the recipe

flour – ¾ cup (approximately 15 tbsp)
castor sugar –  ½ cup or 12-14 tbsp
baking powder – 1 tsp
vanilla extract – 1 tsp
eggs – 3 (at room temperature)
butter – 75 gms (at room temperature)

cocoa powder – 1 ½ tbsp
milk – ¼ cup


the method

Sift together the flour and baking powder three times.

Preheat oven at 180oC. 

Prepare a cake tin – apply butter and then sprinkle flour – dust off excess flour (keep the tin in a refrigerator so that the butter doesn’t melt away)

cake mixing

Place the butter in a slightly deep bowl. Use a fork or electric beater and soften the butter. Add the castor sugar 1 tbsp spoon at a time and continue whisking till the mixture doubles in volume. Add the eggs one by one, whisking one minute per egg. When all three eggs are added whisk for another 5 minutes at high speed. Add the vanilla extract and mix well.

Add the flour 2 tbsp at a time and mix with a wooden spatula. When the flour is thoroughly mixed, divide it into two portions.

Mix the cocoa powder in ¼ cup milk. Add the mixture to one portion of the cake mixture and mix well.

Use two slightly big spoon - one for the vanilla mix and one for the chocolate.

Place one spoon of vanilla mix in the middle of the cake tin (don’t flatten). Then place one spoon of the chocolate mix on the vanilla. Again place the vanilla mix. Repeat the process alternatively till both the mix is placed in the middle of the cake tin. Using the back side of the spatula or the pointing finger, dig into the middle of the chocolate and vanilla cake mix and make swirls with some gap till the end of the tin. The cake mix would have evenly spread. Pat the sides of the tin to get rid of air bubbles. Bake it in the pre heated oven for 22 – 25 minutes. Once the top has formed crust use an aluminium foil or aluminium plate to cover the tin to prevent burning.


Spicy Brinjal and Potato Stir Fry

Brinjal is one of my favourite vegetables. Growing up in the hillstation Valparai we had our own patch of vegetable garden and we use...